This is the guide on how to create a Gravity Form that sends the contact data to your Jetpack CRM with the Gravity Form Connect extension.
Before You Begin
Make sure you have installed and activated the following:
- Gravity Forms (download/purchase from https://www.gravityforms.com/)
- Jetpack CRM
- Jetpack CRM Gravity Forms Connect Extension
You have to first install and activate the Gravity Forms plugin before installing the Gravity Forms Connect extension for Jetpack CRM. Gravity Forms Connect extension is just a connector between your Jetpack CRM and the Gravity Form plugin to automatically create contacts from Gravity Forms.
Make sure Jetpack CRM and Gravity Forms connect extension are installed and activated on the same WordPress installation as your Gravity Forms plugin.
Let’s configure your Gravity Form options/fields to be able to generate the contacts in Jetpack CRM.
Required Fields
You need to set up the following fields at minimum in order for Jetpack CRM to capture Gravity Forms submission into Jetpack CRM contacts:
- Name
- Hidden field with value
jetpackcrm-add
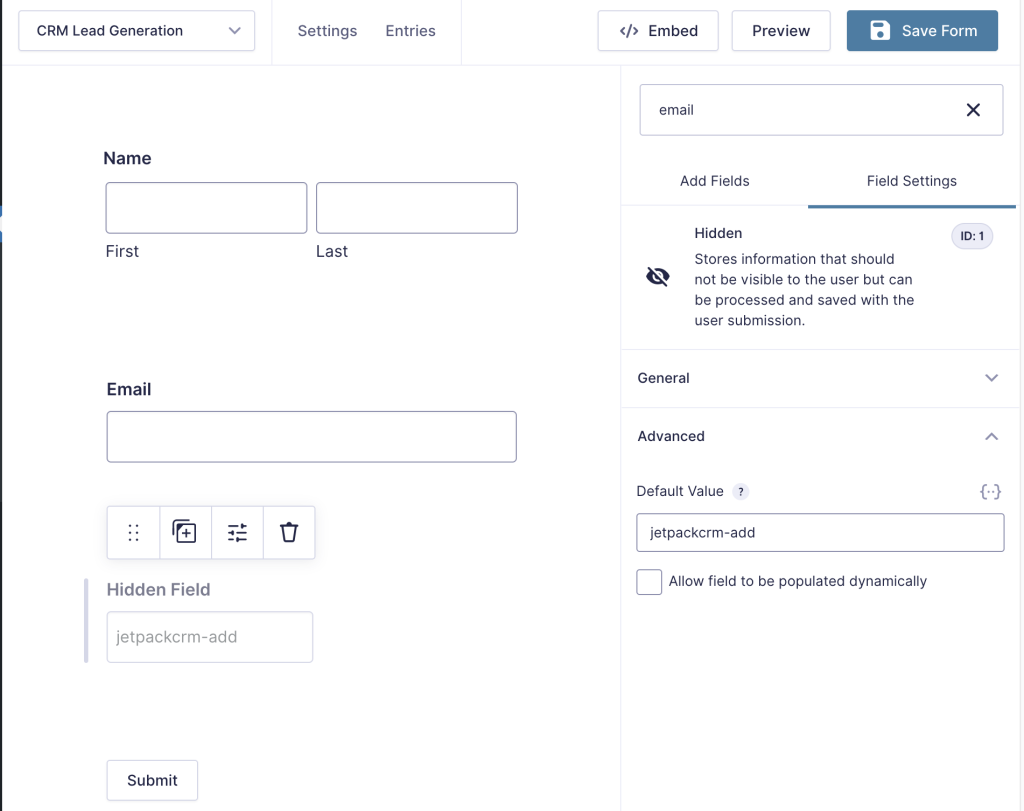
Your initial setup should look like this:

Name and Emails
In the Gravity Forms editor, the Name and Email fields can be found under the Advanced Fields area as shown below.

You do not need to add any admin field labels to the standard fields of Name and Address when using the above options.
Please note, for the Name field, Jetpack CRM does not support collecting middle names or suffixes, but does support collecting prefixes.
Hidden field: jetpackcrm-add
To make sure that Jetpack CRM knows to look at the form submission you MUST add a Hidden field with a default value jetpackcrm-add under Field Settings > Advanced, as shown below:

Storing additional contact fields
Jetpack CRM and the Gravity Form Connector extension can be used to store any contact field that you’ve set up in the CRM. The name, email, and address fields are automatically handled, but other fields need a bit more configuration.
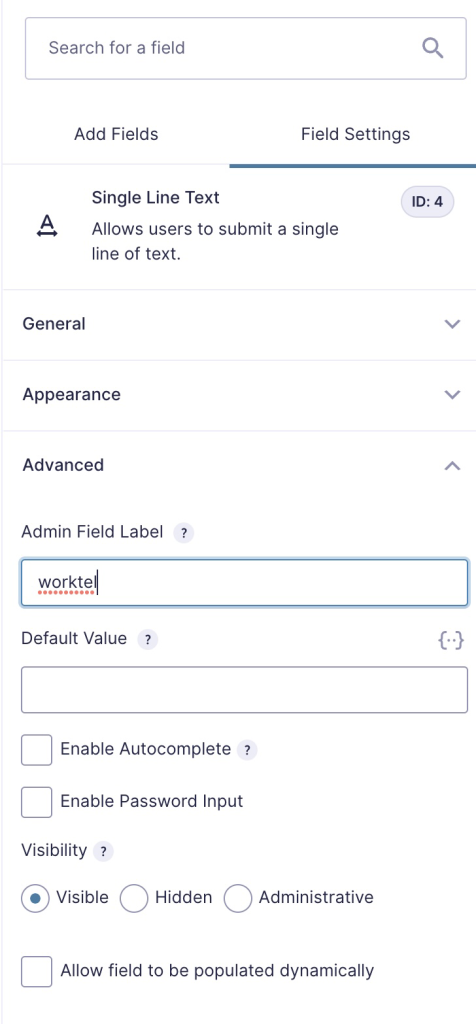
The secret sauce to mapping Gravity Forms fields to the CRM contact fields is to add the appropriate Admin Field Label to each form element. You can find this in the Field Settings sidebar under “Advanced”:

For list of standard CRM contact field names, go here.
Adding Jetpack CRM Custom Fields via Gravity Forms
Background:
Custom fields are stored against customers with a specific ‘indexation.’ This is so users of Jetpack CRM can be flexible and add as many custom fields as they’d like.
Below are steps for adding Jetpack CRM Custom fields via Gravity Forms.
1. Add a custom field with the appropriate field type
In Jetpack CRM > CRM Settings > Custom fields > Contact Custom Fields, add a custom field you’d like to collect via Gravity Forms.
Make sure to match the Field Type with an appropriate type based on what field you’ll use in Gravity Forms. For example in the custom fields shown below, “Date of Birth” custom field should have the Date field type, while the “Checkbox field” should have Checkbox field type.

2. Take note of Jetpack CRM Custom Field slugs
Under each custom field title you’ll see the custom field slug in teal, as date-of-birth in the above example in step 1. Keep note of this slug, as you’ll need it when you set up the corresponding field in the Gravity Form.
3. Add Jetpack CRM Custom Field slugs to Gravity Form Fields
In your Gravity Form, add Jetpack CRM custom field slug in Advanced > Admin Field Label. This tells Jetpack CRM that the input from this field is something you want to store in the custom field.
For example, below shows Date field in Gravity Form with the Admin field label including the Jetpack CRM custom field slug, date-of-birth.

date-of-birth added to Gravity Form fieldsSetting a Status via Gravity Forms
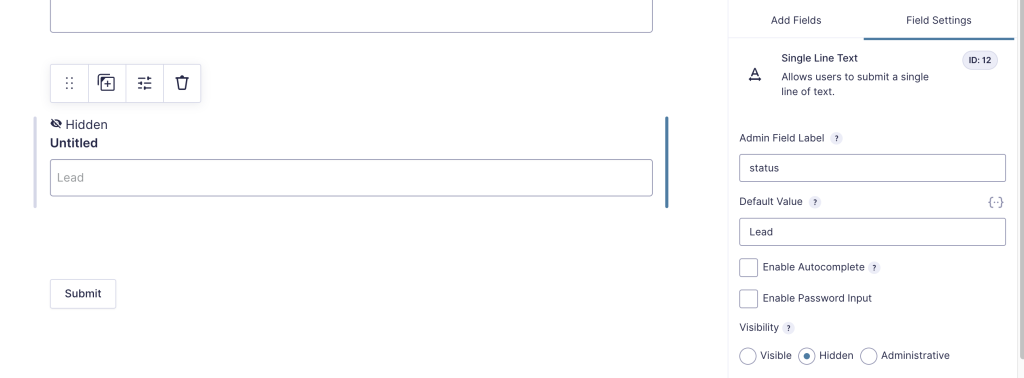
You can also automatically set Jetpack CRM Contact’s status upon the Gravity Form submission by setting the Admin Field Label status and Default Value of the status (i.e., Lead). To do that, follow these steps:

- Add a Single Line Text field into the form, and set the visibility to ‘Hidden’ to prevent the field from showing in the form.
- While the Single Line Text field is selected, navigate to the Field Settings > Advanced on the right sidebar
- In the “Admin Field Label” box, enter
status - In the “Default Value” box, enter status name of your choosing, such as
Lead(replaceleadwith the actual status you want assigned to the contact). - Save the form.
If you have multiple forms and want to have the default contact status within the CRM to be dependent on which form is filled out, you can do it. Once you’ve done the above on each form, contacts should come through with whatever statuses you’ve assigned.
Adding Tags via Gravity Forms
You can automatically add tags to CRM contacts using the hidden Single Line Text field with the admin field label jetpackcrm-tags, following the same step as Setting a Status via Gravity Forms above.
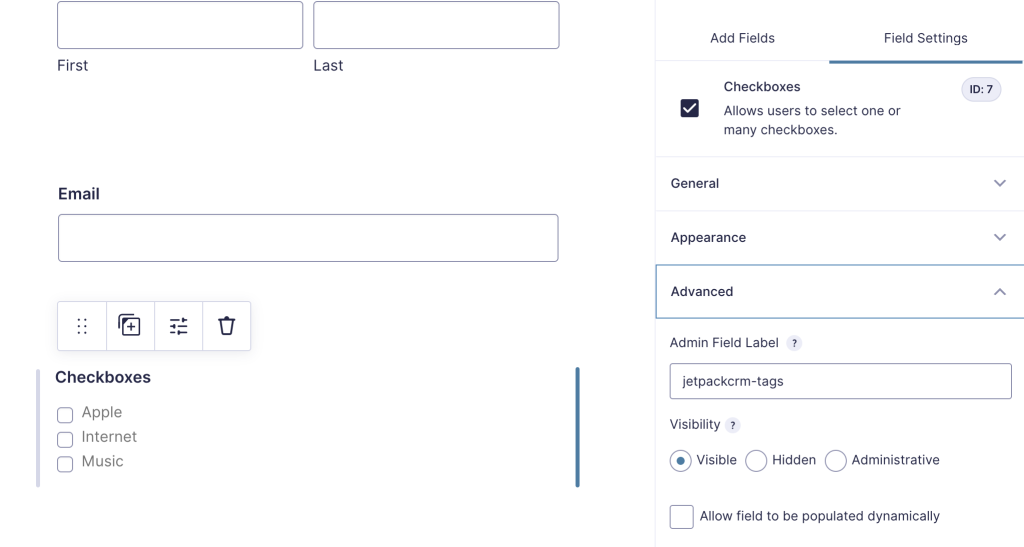
If you’d like to allow CRM Contacts to choose the tag (instead of automatically tagging), you can follow these steps:
- Add a Checkbox field into the form, and set the visibility to ‘Visible’.
- While the Checkbox field is selected, navigate to the Field Settings > Advanced on the right sidebar.
- In the “Admin Field Label” box, enter
jetpackcrm-tags

- In General > Choices, click Edit Choices to add as many options for tags as you want, as shown below. You can specify the value, which will be used as the tag in Jetpack CRM:

- Save the form.
Making Invoices Automatically
Gravity Forms comes with “Product” fields where you can set price and quantity and if these are present in your Gravity Form, you can tell Jetpack CRM to make an invoice on the back of the form data. This is perfect if you’re running an event and want to capture people’s interest and also exactly what they’re looking for.
Example:-
Jetpack CRM: Event
Tickets:  [Quantity] * $200   <-- this being a Product Field in Gravity Forms
First Name Last Name:
Email:
Then when submitted, Jetpack CRM will generate an invoice, for the quantity chosen and it will be ready for the contact to pay.
To tell Jetpack CRM to do this, you need to add another hidden field on your form with jetpackcrm-makeinvoice exactly how the above jetpackcrm-add field is described.
Connecting Gravity Forms from an external site to a CRM site
If you are using Jetpack CRM on a separate site and want to add contacts via Gravity Forms from an external site, please follow the steps in this guide.
A note about company contacts
At the moment, it’s not possible to create a company by using Gravity Forms.

